

![图片[1]-Resin 代理池的部署脚本-MacFun is an interesting website.](https://www.macfun.org/wp-content/uploads/2026/08/image-1-1024x630.png)
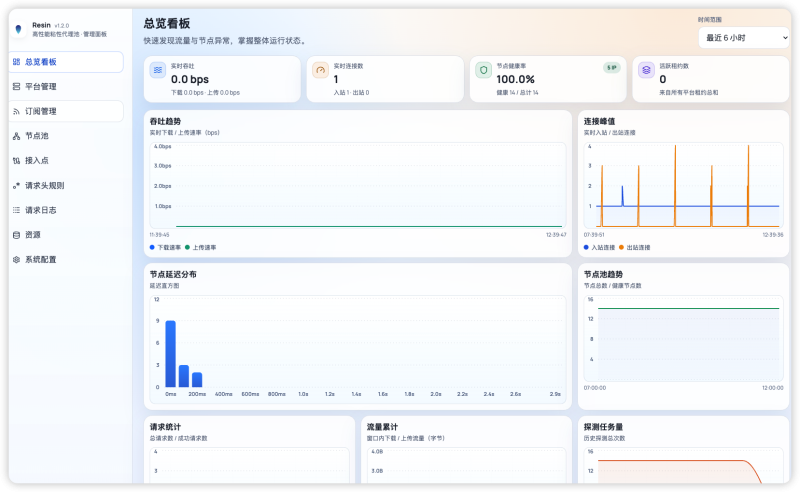
这是一个 Resin 代理池的部署脚本,用于在服务器上运行。部署步骤如下:
前置条件
服务器需要安装 Node.js(v16+)。
# Ubuntu/Debian
curl -fsSL https://deb.nodesource.com/setup_18.x | sudo bash -
sudo apt install -y nodejs

# CentOS/RHEL
curl -fsSL https://rpm.nodesource.com/setup_18.x | sudo bash -
sudo yum install -y nodejs
部署步骤
1. 创建目录并放入脚本
mkdir -p /home/container
cd /home/container
nano start.js   # 把下面的代码粘贴进去
const { execSync, spawn } = require('child_process');
const fs = require('fs');
const path = require('path');
const RESIN_VERSION = 'v1.2.0';
const RESIN_FILE = '/home/container/resin';
const DATA_DIRS = ['data/state', 'data/cache', 'data/log'];
// 创建数据目录
DATA_DIRS.forEach(d => fs.mkdirSync(path.join('/home/container', d), { recursive: true }));
function startResin() {
console.log('>>> 正在启动 Resin...');
const child = spawn(RESIN_FILE, [], {
cwd: '/home/container',
stdio: 'inherit',
env: {
...process.env,
RESIN_ADMIN_TOKEN: '你的管理员密码',
RESIN_PROXY_TOKEN: '你的代理密码',
RESIN_LISTEN_ADDRESS: '0.0.0.0',
RESIN_PORT: process.env.SERVER_PORT || '2260',
RESIN_STATE_DIR: './data/state',
RESIN_CACHE_DIR: './data/cache',
RESIN_LOG_DIR: './data/log',
}
});
child.on('exit', (code) => {
console.log('>>> Resin 已退出,退出码:', code);
process.exit(code);
});
}
// 检查是否已下载
if (fs.existsSync(RESIN_FILE)) {
console.log('>>> Resin 已存在,直接启动');
startResin();
} else {
console.log('>>> Resin 未找到,正在下载...');
// 用 node 自带的 https 下载,不依赖 wget 或 curl
const https = require('https');
const url = `https://github.com/Resinat/Resin/releases/download/${RESIN_VERSION}/resin-linux-amd64.tar.gz`;
const tarFile = '/home/container/resin.tar.gz';
function download(url, dest, cb) {
const file = fs.createWriteStream(dest);
https.get(url, (res) => {
// 处理 GitHub 的 302 重定向
if (res.statusCode === 301 || res.statusCode === 302) {
console.log('>>> 跟随重定向...');
download(res.headers.location, dest, cb);
return;
}
const total = parseInt(res.headers['content-length'], 10);
let downloaded = 0;
res.on('data', (chunk) => {
downloaded += chunk.length;
if (total) {
const pct = ((downloaded / total) * 100).toFixed(1);
process.stdout.write(`\r>>> 下载进度: ${pct}% (${(downloaded/1024/1024).toFixed(1)}MB)`);
}
});
res.pipe(file);
file.on('finish', () => {
file.close();
console.log('\n>>> 下载完成!');
cb();
});
}).on('error', (err) => {
fs.unlinkSync(dest);
console.error('>>> 下载失败:', err.message);
process.exit(1);
});
}
download(url, tarFile, () => {
console.log('>>> 正在解压...');
try {
execSync(`tar -xzf ${tarFile}`, { cwd: '/home/container', stdio: 'inherit' });
fs.unlinkSync(tarFile);
execSync(`chmod +x ${RESIN_FILE}`);
console.log('>>> 安装完成!');
startResin();
} catch (e) {
console.error('>>> 解压失败:', e.message);
process.exit(1);
}
});
}2. 修改密码(关键步骤)
把脚本里这两行改成你自己的密码:
RESIN_ADMIN_TOKEN: '你的管理员密码',   // 改成强密码
RESIN_PROXY_TOKEN: '你的代理密码',     // 改成强密码
3. 修改端口(可选)
默认端口是 2260,如果要改:
RESIN_PORT: process.env.SERVER_PORT || '2260', // 改成你想要的端口4. 开放防火墙端口
# Ubuntu (ufw)
sudo ufw allow 2260/tcp

# CentOS (firewalld)
sudo firewall-cmd --permanent --add-port=2260/tcp
sudo firewall-cmd --reload

# 云服务器还需要在控制台的「安全组」里开放对应端口
5. 启动
node /home/container/start.js首次运行会自动从 GitHub 下载 resin 二进制文件并解压,之后直接启动。
保持后台运行(推荐用 PM2)
npm install -g pm2
pm2 start /home/container/start.js --name resin
pm2 save
pm2 startup   # 设置开机自启
访问
启动后浏览器打开:http://你的服务器IP:2260
用 RESIN_ADMIN_TOKEN 里设置的密码登录管理界面。
注意:脚本里写死了路径 /home/container,如果你的服务器用其他路径需要全部替换。云服务器还要确认安全组规则放行了端口。
© 版权声明
文章版权归作者所有,未经允许请勿转载。
THE END




暂无评论内容